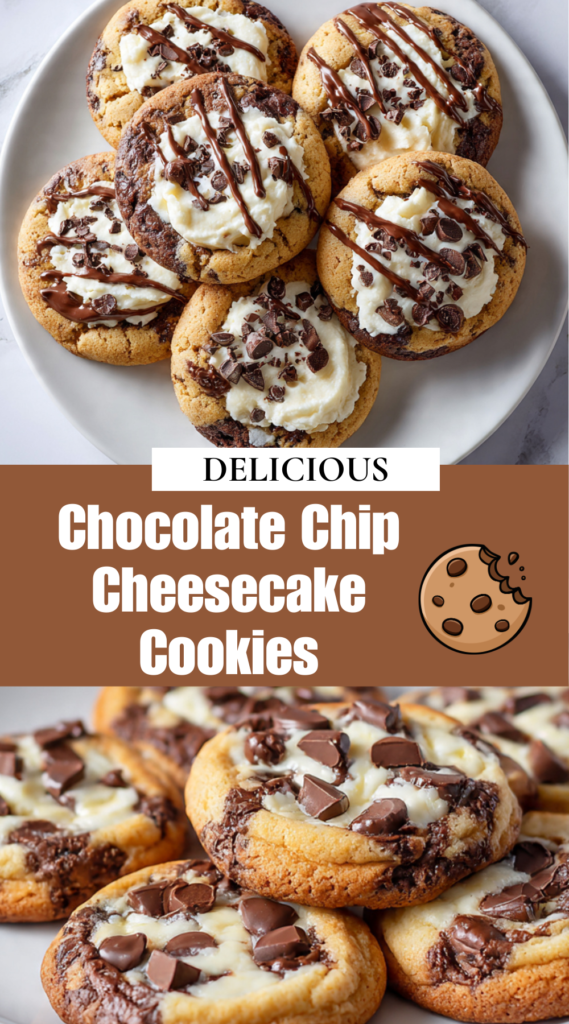
Delicious Chocolate Chip Cheesecake Cookies
The kitchen was already a bit messy from lunch, so I cleared a small space on the counter and got to work. There wasn’t any grand plan or a special occasion; it was just a Tuesday afternoon, and the kids would be home from school soon, likely looking for something to eat while they did their homework. I wanted something that felt substantial—not a thin, crispy wafer, but a soft, almost pillowy cookie that stayed moist even if it sat out for a few hours.
Why Cream Cheese and Semi-Sweet Morsels?
The logic behind using cream cheese here isn’t about making the cookie taste like a literal slice of New York cheesecake. Rather, it’s about the fat content and the acidity. I’ve noticed that when I use only butter, the cookies tend to spread more, especially if my kitchen is warm. By replacing a portion of the butter with block cream cheese, the dough feels heavier and more stable. I used the standard full-fat block—the kind you have to unwrap from the foil—because the whipped versions or the spreads in the plastic tubs have too much air and water, which usually ruins the texture of a bake.
I went with semi-sweet chocolate chips because the dough itself is quite rich. I did briefly consider using milk chocolate, but I thought it might make the whole thing a bit too cloying. The semi-sweet chips provide a necessary bitterness that cuts through the creaminess of the dough. I also added a slightly larger amount of vanilla extract than I usually do. Because cream cheese has such a distinct, lactic flavor, a heavy hand with vanilla helps bridge the gap between the “cheese” flavor and the “cookie” flavor, making it taste more like a unified dessert.
I didn’t chill the flour or do anything fancy. I just pulled the ingredients from the pantry and made sure the butter and cream cheese were soft enough to incorporate without leaving little white lumps in the batter.
Mixing Bowl
When I started creaming the butter, cream cheese, and sugars together, I noticed right away that the mixture looked different than a standard cookie dough. It was paler and much smoother. It didn’t have that gritty, sandy look that butter and sugar usually have; it looked almost like a thick frosting. I had to stop the mixer three or four times to scrape the bottom of the bowl because the cream cheese liked to stick to the very center where the paddle couldn’t reach.
Adding the egg was a bit of a turning point. For a moment, the mixture looked like it wanted to break or curdle—it got slippery and separated into small clumps. I didn’t panic; I just turned the mixer up a notch for about thirty seconds until it smoothed back out. Once I added the dry ingredients, the dough became very thick. It wasn’t sticky like a brownie batter, but it was definitely more “tacky” than a traditional chocolate chip cookie dough.
I did run into a small issue with the temperature. My kitchen was a bit warm because I had the oven preheating, and I could tell the dough was getting a little too soft to scoop cleanly. Instead of fighting with it and ending up with flat cookies, I put the whole bowl in the fridge for about twenty minutes. It wasn’t a long chill, but it was enough to make the dough manageable so I could roll it into neat mounds.
Observations at the Oven Door
I baked the first tray on the middle rack. About six minutes in, I looked through the glass and saw that they weren’t spreading much at all. They stayed quite mounded. I realized I hadn’t pressed them down, so the heat wasn’t penetrating the center as quickly as I wanted. On the second batch, I used the back of a spoon to slightly flatten the tops before putting them in, which resulted in a much more even bake.
The timing was a bit tricky. With regular cookies, you look for those brown, crispy edges. With these cheesecake cookies, they don’t really brown the same way. If you wait for the tops to turn golden, you’ve probably overbaked them, and the cream cheese will make them tough. I found that taking them out when the edges were just barely set—even if the centers still looked a little “wet” or matte—was the right move. They firm up significantly as they sit on the hot baking sheet.
One thing I noticed was the smell. It’s less like toasted sugar and more like a warm, baked pastry. I had to adjust my oven temperature down by about twenty-five degrees halfway through because the bottoms were browning faster than the tops were setting. Every oven is different, but in mine, 350°F was a bit too aggressive for these. 325°F allowed them to puff up and cook through without scorching the base.
Serving and the Morning After
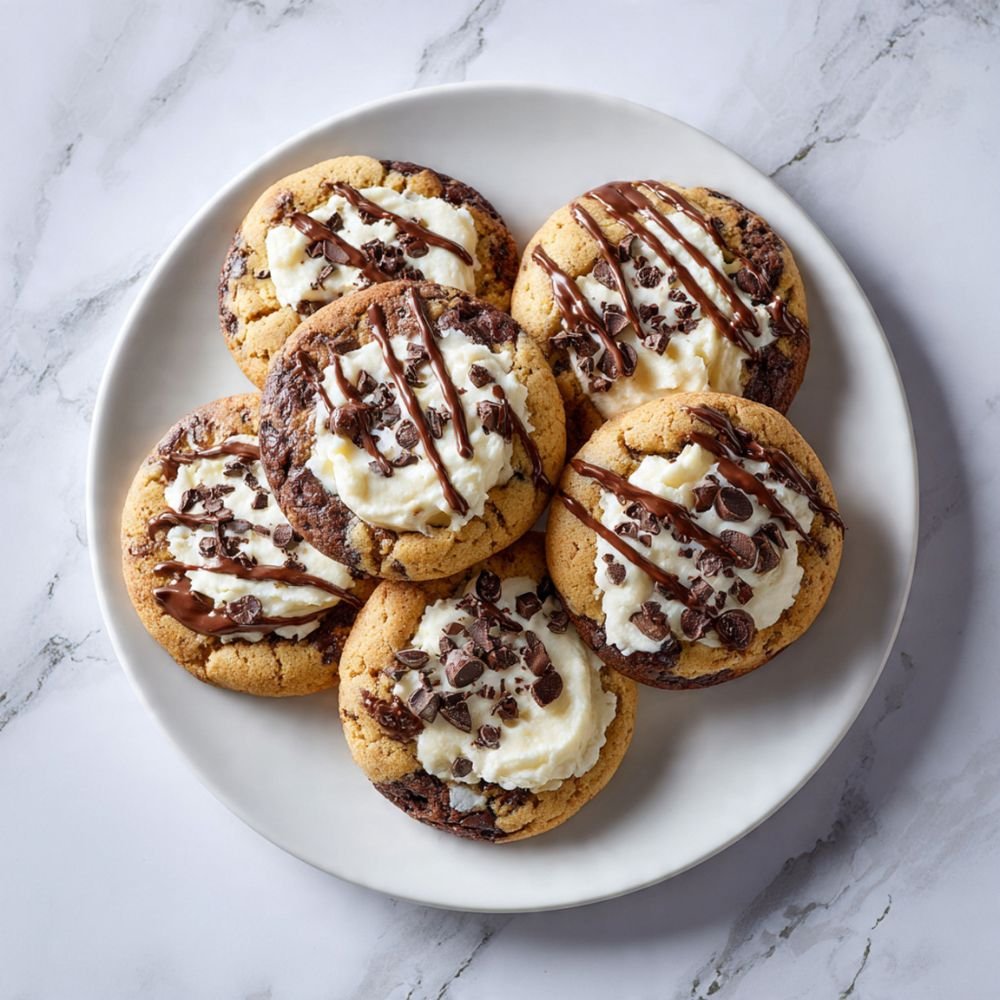
Once they were out and cooled enough to touch, I put a few on a plate for the kids. They were a hit, mostly because they are so soft. They have a texture that’s almost halfway between a muffin top and a cookie. There’s no “snap” to these; they are strictly for people who like a soft, chewy bite.
We had about a dozen left over, so I put them in a plastic container with a tight lid. Usually, cookies get a bit stale or hard by the next morning, but these actually seemed to improve. The moisture from the cream cheese kept them very soft. I had one with my coffee the next morning, and the flavors seemed more settled—the tang of the cheese was more balanced with the chocolate.
I wouldn’t recommend stacking them while they are even slightly warm, though. Because they are so soft, they will stick together and you’ll end up with a giant clump of cookie. I let mine cool completely on a wire rack for nearly an hour before I even thought about putting them in a container.
Final Thoughts
This isn’t a recipe I would make if I wanted a classic, crunchy cookie to dunk in milk. It’s more of a “stand-alone” dessert. It felt like a good way to use up ingredients I already had, and it filled that gap between a heavy cheesecake and a simple snack. I think these would be particularly good for a casual lunch get-together or just to have in the jar for a few days, since they hold their texture so much better than standard bakes. I’ll likely do this again the next time I find a stray block of cream cheese in the fridge and don’t feel like making a full cake.
Chocolate Chip Cheesecake Cookies
Soft, pillowy cookies with a cream cheese swirl and melty chocolate chips throughout. These cookies combine the best of chocolate chip cookies with the tangy richness of cheesecake for an irresistible treat.
shopping_basket Ingredients
- 8 oz cream cheese, softened
- ½ cup granulated sugar
- 1 tsp vanilla extract
- 1 cup unsalted butter, softened
- 1 cup brown sugar, packed
- ½ cup granulated sugar
- 2 large eggs
- 3 cups all-purpose flour
- 1 tsp baking soda
- ½ tsp salt
- 2 cups semi-sweet chocolate chips
- ½ cup chopped walnuts or pecans
- 1 tsp sea salt flakes for topping
list Instructions
- Prepare Cheesecake Swirl: In a medium bowl, beat 8 oz cream cheese, ½ cup granulated sugar, and 1 tsp vanilla until smooth and creamy. Set aside.
- Cream Butter & Sugars: In a large bowl, beat 1 cup softened butter, 1 cup brown sugar, and ½ cup granulated sugar until light and fluffy, about 3 minutes.
- Add Eggs: Beat in 2 eggs one at a time, mixing well after each addition. Scrape down the bowl as needed.
- Combine Dry Ingredients: In a separate bowl, whisk together 3 cups flour, 1 tsp baking soda, and ½ tsp salt.
- Mix Dough: Gradually add the dry ingredients to the butter mixture, mixing until just combined. Fold in 2 cups chocolate chips.
- Create Swirl: Drop spoonfuls of cookie dough onto baking sheets. Add a small dollop (about 1 tsp) of cream cheese mixture to the center of each cookie.
- Bake: Preheat oven to 350°F (175°C). Bake cookies for 10-12 minutes until edges are golden but centers are still soft.
- Cool: Remove from oven and let cookies cool on baking sheets for 5 minutes before transferring to wire racks to cool completely.
monitor_heart Nutrition Information
Per Cookie (approx.)
lightbulb Success Tips & Variations
- Properly softened butter and cream cheese: Let them sit at room temperature for 1-2 hours. This ensures even mixing and prevents lumpy batter.
- Don’t overmix: Mix the dough until just combined. Overmixing develops gluten and makes cookies tough instead of tender.
- Chill dough if needed: If dough seems too soft, refrigerate for 30 minutes before scooping. This prevents cookies from spreading too much.
- Use parchment paper: Line baking sheets with parchment paper for easy removal and to prevent sticking.
- Try different chips: Substitute milk chocolate, dark chocolate, or white chocolate chips. Add peanut butter chips for a twist.
- Make ahead: Cookie dough can be refrigerated for up to 3 days or frozen for 3 months. Scoop dough balls before freezing.
package Storage & Reheating
Storage: Store cooled cookies in an airtight container at room temperature for up to 5 days. Layer with parchment paper to prevent sticking.
Refrigeration: Because of the cream cheese, these cookies can be refrigerated for up to 7 days. Let come to room temperature before serving.
Freezing: Freeze baked cookies in a single layer, then transfer to freezer bags for up to 3 months. Thaw at room temperature or warm in a 300°F oven for 5 minutes.
Save or Share this Recipe