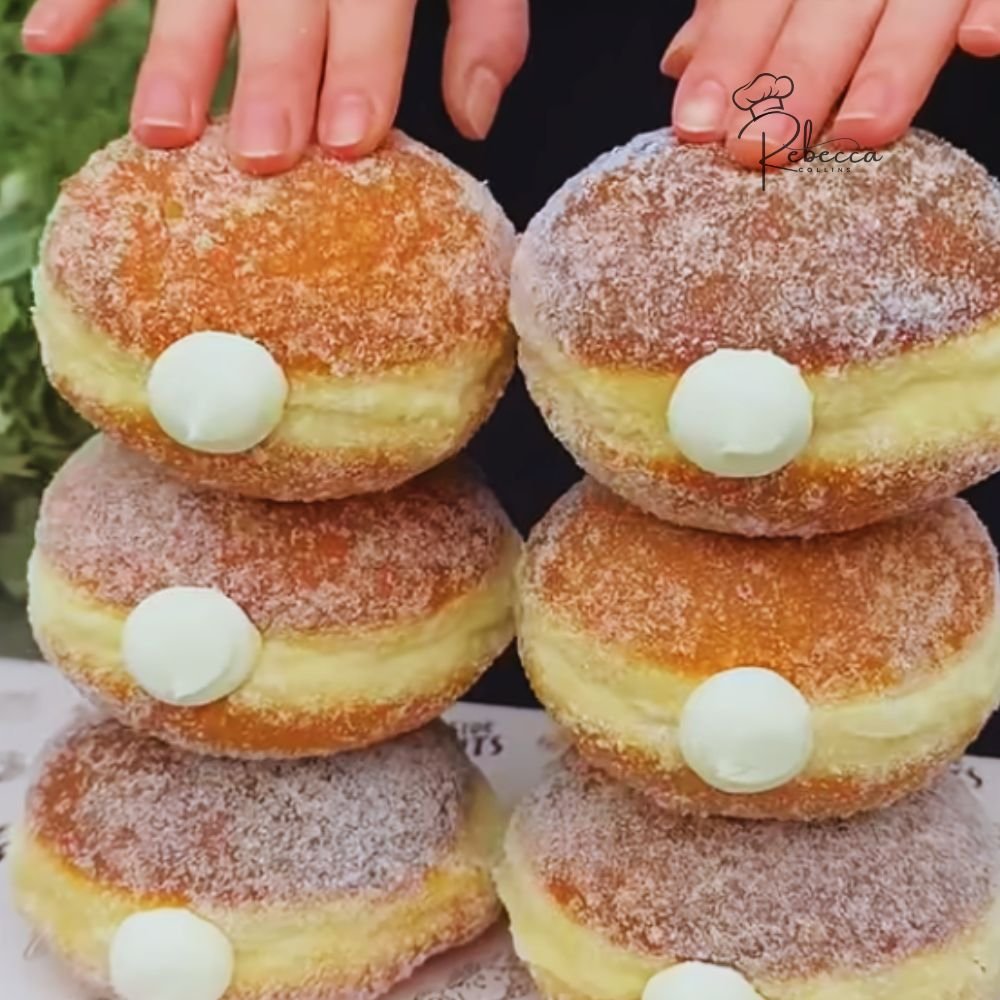
Japan’s Cheese Cream Donuts
I first encountered these when I saw a line snaking around a block in Tokyo for a shop called I’m donut?. These aren’t your typical heavy, cakey donuts. They are “Nama” (raw/fresh) donuts—impossibly light, brioche-style clouds that feel like they might float away if you don’t hold onto them. The “Cheese Cream” version is the ultimate balance: a tangier, more sophisticated take on the standard custard filling. Making them at home is a labor of love that involves a very wet, buttery dough, but the first bite makes every minute of kneading worth it.
What Happened While Cooking
The “almost went wrong” moment happened during the filling stage. I had spent all day on the dough, but when I whipped up the cheese cream, I over-whipped the heavy cream. It started to look grainy and “broken,” more like butter than a silky filling. I panicked, thinking I’d have to start the filling from scratch. To save it, I added two tablespoons of un-whipped cold heavy cream and a spoonful of room-temperature cream cheese, then gently folded it by hand with a spatula. It smoothed right back out into a luscious, velvety cream. It was a close call that reminded me: when it comes to delicate Japanese fillings, the whisk is your friend, but the spatula is your safety net.
Ingredient Notes
- Brioche Dough: This is a high-hydration dough with plenty of eggs and butter. It’s sticky and a bit of a nightmare to handle at first, but that’s exactly what creates the “melting” texture.
- The “Cheese” Element: Most Japanese versions use a mix of mascarpone or cream cheese folded into a light diplomat cream (custard + whipped cream). It gives it a cheesecake-like tang without the heaviness.
- Bread Flour: I used high-protein bread flour to ensure the donuts had enough structure to hold that generous amount of cream without collapsing.
Step-by-Step Cooking Experience
- The Long Knead: I kneaded the dough until it passed the “windowpane test.” Because of the high butter content, this took about 15 minutes in the mixer. It transformed from a sticky mess into a glossy, elastic ball.
- The Overnight Rise: I let the dough proof in the fridge overnight. Cold fermentation develops a much deeper, complex flavor and—more importantly—makes the buttery dough much easier to shape the next morning.
- The Gentle Fry: I fried them at a slightly lower temperature (around 325°F/160°C). Since the dough is so airy, it browns quickly; you want to make sure the inside is cooked through before the outside gets too dark.
- The “Pocket” Poke: Once cooled, I used a small knife to poke a hole in the side and swiveled it around to create a “cave” for the filling.
- The Heavy Fill: I piped the cheese cream in until the donut felt heavy in my hand. In Japan, these are often filled until the cream is practically bursting out of the side.
Mistakes & Fixes
I made the mistake of trying to fill the donuts while they were still slightly warm. The heat from the dough immediately started to melt the whipped cream in my cheese mixture, turning it into a runny liquid that leaked out everywhere. To fix it, I had to stop immediately, put the remaining donuts in the fridge for 20 minutes to chill completely, and re-whip my filling. Next time, I’ll be patient—the donut must be stone-cold before that delicate cream goes anywhere near it.
Serving & Leftovers
I served these with a very light dusting of powdered sugar and a tiny pinch of lemon zest on top to highlight the tang of the cheese. They are best eaten within two hours of filling; the contrast between the slightly crisp fried shell and the cold, pillowy center is the whole point. For leftovers, these don’t store particularly well because the cream softens the dough over time. If you have extras, keep them in the fridge, but expect them to be more like a “cream bun” the next day—still delicious, but the “Nama” magic fades fast.
It’s a technical, rewarding bake that brings a piece of Tokyo’s viral food scene right into your kitchen, and I’ll definitely be using that “over-whipped cream fix” for all my future pastry projects.
Japan’s Cheese Cream Donuts
Incredibly soft, fluffy yeast donuts filled with a luscious, creamy cheesecake-like filling. These Japanese-style donuts are dusted with powdered sugar and are pure bliss with every bite. A little effort for an extraordinary treat!
shopping_basket Ingredients
- 3½ cups bread flour (plus more for dusting)
- ½ cup granulated sugar
- 2¼ tsp instant yeast (1 packet)
- ½ tsp salt
- ¾ cup whole milk, warm (110°F)
- 2 large eggs, room temperature
- 6 tbsp unsalted butter, softened
- 8 oz cream cheese, softened
- ½ cup powdered sugar
- ½ cup heavy whipping cream
- 1 tsp vanilla extract
- 6 cups vegetable oil (for frying)
- ½ cup powdered sugar (for dusting)
list Instructions
- Make Dough: In a stand mixer bowl, combine flour, sugar, yeast, and salt. Add warm milk and eggs. Mix with dough hook on low until a shaggy dough forms.
- Knead: Knead on medium-low for 5-7 minutes until dough is smooth and elastic. Gradually add softened butter, a tablespoon at a time, kneading until fully incorporated and dough is soft and slightly tacky.
- First Rise: Place dough in a lightly oiled bowl, cover with plastic wrap, and let rise in a warm place until doubled in size, about 1-1.5 hours.
- Shape Donuts: Punch down dough. On a lightly floured surface, roll out to ½-inch thickness. Cut into rounds using a 3-inch cutter. Place on parchment-lined baking sheets, cover loosely, and let rise for 30-45 minutes until puffy.
- Make Filling: In a bowl, beat cream cheese and powdered sugar until smooth. In a separate bowl, whip heavy cream and vanilla to stiff peaks. Gently fold whipped cream into cream cheese mixture. Transfer to a piping bag fitted with a small round tip. Refrigerate until ready to use.
- Heat Oil: In a large pot, heat oil to 350°F (175°C).
- Fry Donuts: Gently place 2-3 donuts at a time into the hot oil. Fry for 1-2 minutes per side until golden brown. Remove with a slotted spoon and drain on a wire rack. Cool completely.
- Fill Donuts: Insert the piping tip into the side of each donut and gently fill with cheese cream until you feel the donut expand slightly.
- Dust & Serve: Generously dust filled donuts with powdered sugar. Serve immediately for the ultimate texture experience.
monitor_heart Nutrition Information
Per Serving (1 filled donut)
lightbulb Success Tips & Variations
- Temperature is key: Ensure milk is warm (not hot) to activate yeast, and cream cheese is softened for a lump-free filling.
- Don’t overfill: Add just enough cream until the donut feels heavy; too much can cause the donut to burst.
- Flavor twist: Add lemon zest to the filling for a refreshing touch, or mix in matcha powder for a Japanese-inspired green tea version.
- Chocolate version: Dip the tops of filled donuts in melted chocolate instead of dusting with sugar.
- Baked option: For a lighter version, bake shaped donuts at 375°F for 10-12 minutes, then fill. The texture will be more bread-like but still delicious.
- Make ahead: Prepare the filling a day ahead and keep refrigerated. Fry donuts the day of serving for best texture.
package Storage & Reheating
Storage: These donuts are best enjoyed the day they are made. Store leftovers in an airtight container in the refrigerator for up to 2 days. The texture will soften.
Serving: If refrigerated, let donuts sit at room temperature for 20 minutes before serving to soften the filling.
Freezing: Freeze unfilled, fried donuts in a freezer bag for up to 2 months. Thaw and reheat in a 350°F oven for 5 minutes, cool, then fill and dust.
help Frequently Asked Questions
Can I use all-purpose flour instead of bread flour?
Bread flour has higher protein, which gives the donuts their signature chewy, fluffy texture. All-purpose will work, but the result will be slightly less tender and airy.
My dough is too sticky. What should I do?
Avoid adding too much extra flour. Try lightly oiling your hands and the work surface. The dough should be soft and slightly tacky but not unworkable. Kneading fully helps develop gluten and reduces stickiness.
How do I know when the oil is at the right temperature?
Use a deep-fry thermometer for accuracy. If the oil is too hot, the outside will burn before the inside cooks. Too cool, and the donuts will absorb excess oil and be greasy.
Can I make these into donut holes?
Yes! Roll the dough into small 1-inch balls after the first rise, let them rise again, then fry. You can fill them with a smaller tip or simply serve them plain with the cream for dipping.
reviews Rate This Recipe
SAVE THIS RECIPE

Leave feedback about this