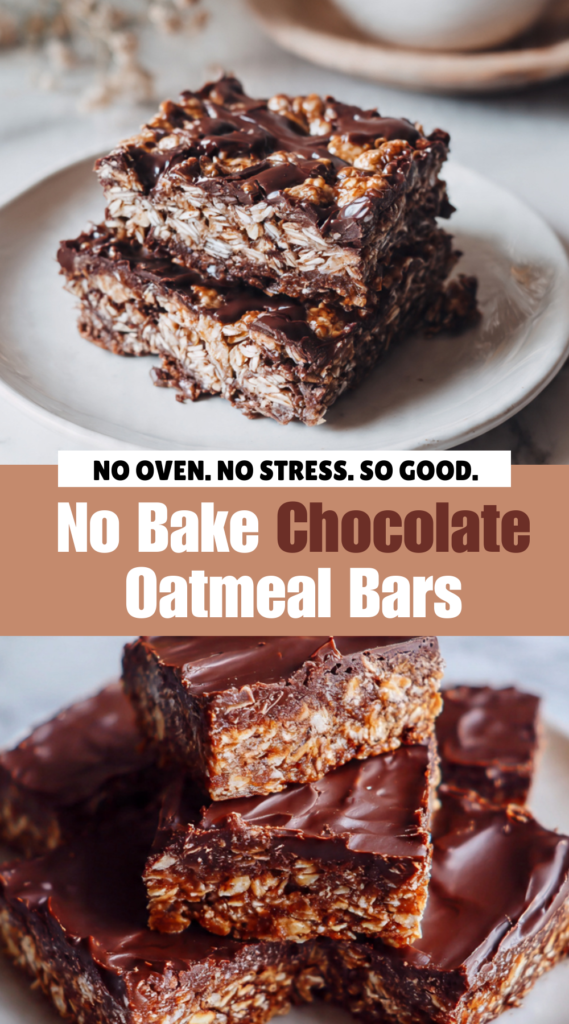
No Bake Chocolate Oatmeal Bars
No bake bars seemed like the right move—quick, no heat, and I could make them in one pot. I also liked the idea of having something ready to eat for the next few days without having to bake every time I wanted dessert.
What Happened While Cooking
The mixture looked too wet when I first stirred everything together. I’d melted the butter with sugar and cocoa powder, and when I added the oats, it turned into this glossy, sticky mess that didn’t seem like it would hold its shape. I almost added more oats to thicken it up, but I decided to press it into the pan first and see what happened. After it chilled in the fridge for an hour, it firmed up more than I expected—almost too firm in some spots where I’d pressed it down harder than others. The chocolate topping melted fine, but when I tried to spread it evenly, it started pulling up bits of the oat layer underneath. I had to work quickly and use a light touch with the spatula to keep the layers separate.
Ingredient Notes
I used old-fashioned rolled oats, not quick oats or steel-cut. Quick oats would’ve turned mushy, and steel-cut oats wouldn’t soften enough without cooking. The butter I used was salted, so I didn’t add extra salt, but if you’re using unsalted butter, a pinch of salt would help balance the sweetness. For the cocoa powder, I used regular unsweetened cocoa powder from the grocery store—nothing fancy. The sugar was just white granulated sugar, and I thought about using brown sugar for a deeper flavor, but I didn’t want it to be too rich. The chocolate chips for the topping were semi-sweet. Milk chocolate would’ve been sweeter, and dark chocolate would’ve been more bitter, so semi-sweet felt like the middle ground. I added a tablespoon of peanut butter to the base mixture because I had it open, and it helped everything stick together a little better, but you could leave it out.
Step-by-Step Cooking Experience
I lined an 8×8-inch pan with parchment paper, letting it hang over the edges so I could lift the bars out later. In a medium saucepan, I melted half a cup of butter over medium heat. Once it was fully melted, I stirred in half a cup of sugar and a quarter cup of cocoa powder. The mixture turned dark and glossy, and I let it bubble gently for about a minute, stirring constantly so it didn’t scorch. Then I took the pan off the heat and stirred in a tablespoon of peanut butter and a teaspoon of vanilla extract. The peanut butter melted into the hot mixture and made it even shinier.
I dumped in three cups of oats and stirred everything together with a wooden spoon. At first it looked like there wasn’t enough liquid to coat all the oats, but as I kept stirring, the oats absorbed the chocolate mixture and it came together into a thick, sticky mass. I scooped it all into the prepared pan and pressed it down with the back of the spoon, then switched to using my hands because the spoon wasn’t flattening it evenly. I pressed harder in the center than I meant to, which made the edges a little thicker.
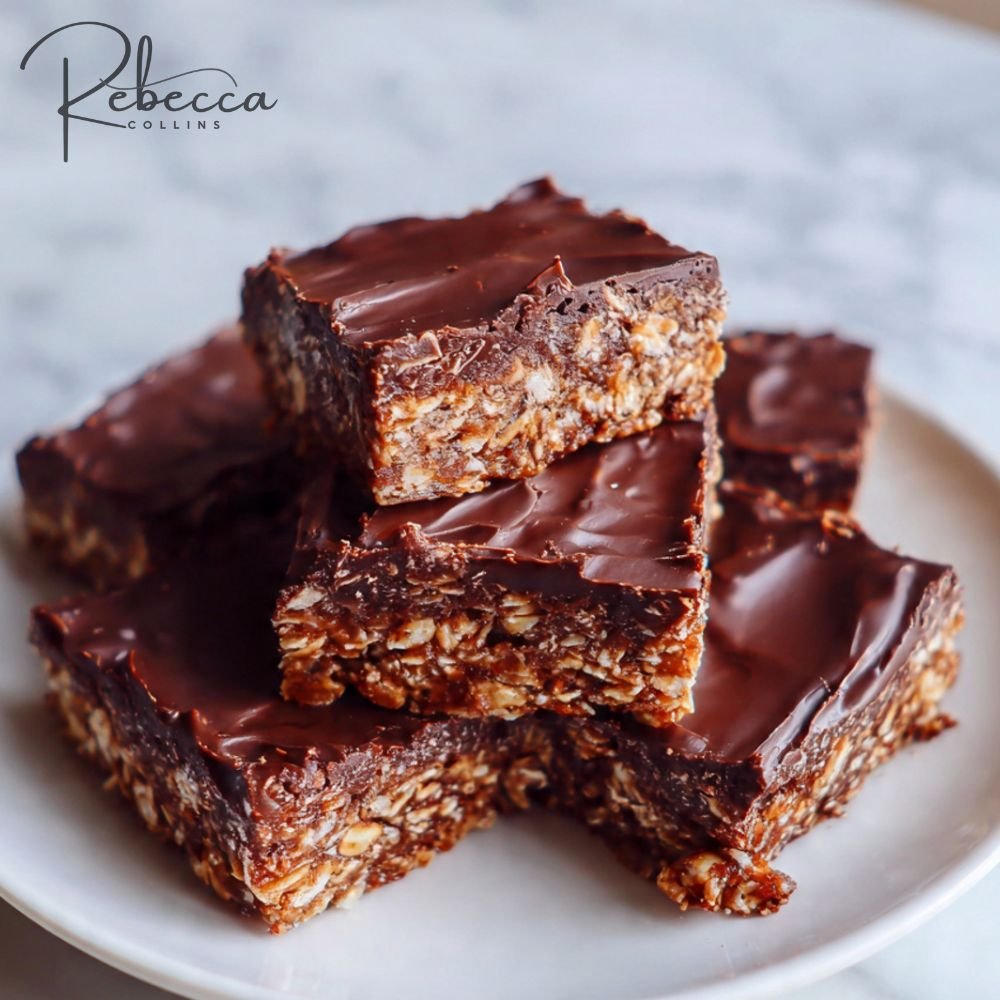
For the topping, I put a cup of chocolate chips in a microwave-safe bowl and heated them in twenty-second intervals, stirring between each one. After about a minute total, they were melted and smooth. I poured the chocolate over the oat layer and used an offset spatula to spread it out. The chocolate was warm enough that it wanted to drag the oat layer with it, so I barely touched the surface and let the chocolate settle on its own. I stuck the pan in the fridge and left it there for about an hour and a half.
Mistakes & Fixes
I pressed the base layer too unevenly, so when I cut the bars, some pieces were thicker and chewier than others. Next time I’d use a flat-bottomed measuring cup or glass to press everything down evenly instead of my hands. I also should’ve let the chocolate topping cool for a minute or two before spreading it. It was too warm and melty, which made it harder to work with. If you wait just a bit, it thickens slightly and spreads more cleanly. The bars were hard to cut straight from the fridge because they were so firm. I let them sit at room temperature for about five minutes before slicing, and that made it easier to get clean cuts without cracking the chocolate layer.
Serving & Leftovers
I cut the bars into sixteen squares and kept them in the same pan, covered with plastic wrap, in the fridge. My dad stopped by later that evening and ate two of them standing at the counter. He said they reminded him of the no bake cookies his mom used to make, which I took as a good sign. The texture was chewy and dense, not crumbly, and the chocolate topping added a little snap when you bit into it. I kept them in the fridge for about five days, and they stayed fresh the whole time. They softened a bit if left out at room temperature for too long, so I just kept grabbing them straight from the fridge. They were actually better cold—firmer and more satisfying.
I’d make these again when I want something sweet without heating up the kitchen, though I’d be more careful pressing the base layer next time.
No Bake Chocolate Oatmeal Bars
Rich chocolate and peanut butter layered with hearty oats in these easy no-bake bars. Perfect for a quick dessert, snack, or even breakfast. These bars come together in minutes and require no oven time.
shopping_basket Ingredients
- 1 cup unsalted butter
- ½ cup packed brown sugar
- 1 tsp vanilla extract
- 3 cups quick-cooking oats
- 1 cup creamy peanut butter
- 1 cup semi-sweet chocolate chips
- ¾ cup milk chocolate chips
- ¼ cup chopped peanuts (optional)
list Instructions
- Prepare Pan: Line an 8×8 inch baking pan with parchment paper, leaving overhang on two sides for easy removal. Lightly grease the parchment paper.
- Melt Butter and Sugar: In a medium saucepan over medium heat, melt the butter. Stir in brown sugar until completely dissolved and mixture is smooth, about 2-3 minutes.
- Add Vanilla and Oats: Remove from heat and stir in vanilla extract. Add quick-cooking oats and stir until all oats are thoroughly coated with the butter mixture.
- Press First Layer: Press half of the oat mixture firmly into the bottom of the prepared pan. Use the back of a spoon or a measuring cup to create an even, compact layer.
- Melt Peanut Butter and Chocolate: In a microwave-safe bowl or using a double boiler, melt peanut butter and chocolate chips together, stirring every 30 seconds until smooth. Alternatively, use separate bowls if preferred.
- Spread Chocolate Layer: Pour the melted chocolate and peanut butter mixture over the pressed oat layer. Spread evenly with a spatula.
- Add Top Layer: Sprinkle the remaining oat mixture evenly over the chocolate layer. Gently press down with your hands or a spoon to help it adhere.
- Chill and Set: Refrigerate for at least 2 hours, or until completely firm. For best results, chill overnight.
- Slice and Serve: Use the parchment paper overhang to lift the bars out of the pan. Place on a cutting board and slice into 12 bars. Store in refrigerator.
monitor_heart Nutrition Information
Per Serving (1 bar)
lightbulb Success Tips & Variations
- Press firmly: When pressing the oat layers, press as firmly as possible. This helps the bars hold together better when sliced.
- Quick oats work best: Quick-cooking oats create a better texture than old-fashioned rolled oats for no-bake bars.
- Use natural peanut butter: Natural peanut butter works well, but ensure it’s stirred thoroughly before measuring.
- Chocolate variations: Use dark chocolate chips, white chocolate chips, or butterscotch chips for different flavor profiles.
- Add-ins: Stir in ½ cup of shredded coconut, raisins, or dried cranberries to the oat mixture for extra texture.
- Nut-free option: Substitute sunflower seed butter for peanut butter and omit chopped peanuts for a nut-free version.
package Storage & Serving
Storage: Store bars in an airtight container in the refrigerator for up to 2 weeks. They can also be frozen for up to 3 months. Separate layers with parchment paper if stacking.
Serving: Serve chilled directly from refrigerator. The bars are firm but still chewy when cold. Allow to sit at room temperature for 5-10 minutes for a softer texture.
Freezing: Freeze individually wrapped bars in a single layer, then transfer to a freezer bag. Thaw in refrigerator overnight or at room temperature for 30 minutes.
help Frequently Asked Questions
Can I use old-fashioned oats instead of quick oats?
Quick oats are recommended as they absorb the butter mixture better and create a more cohesive bar. If using old-fashioned oats, pulse them a few times in a food processor to break them down slightly.
Can I make these bars vegan?
Yes! Use vegan butter, coconut sugar instead of brown sugar, vegan chocolate chips, and a plant-based peanut butter. Check that all ingredients are certified vegan.
My bars are too crumbly. What did I do wrong?
This usually means the oat layers weren’t pressed firmly enough, or the bars weren’t chilled long enough. Ensure you press very firmly and chill for at least 2 hours, preferably overnight.
Can I use honey or maple syrup instead of brown sugar?
Yes, but the texture will be different. Liquid sweeteners make bars softer and less firm. Reduce the amount to ⅓ cup and be aware they may need longer chilling time to set properly.
SAVE THIS RECIPE
Leave feedback about this